Docker Security Under the Hood: Runtime Security Model Explained
Introduction
Container security has improved dramatically over the past decade, but the advice surrounding it often hasn't.
If you've searched for Docker security best practices, you've probably seen recommendations like:
- Don't run as root.
- Drop unnecessary capabilities.
- Use a read-only filesystem.
- Enable seccomp.
- Never use
--privileged.
These are all solid recommendations, however they're often presented as rules to follow rather than concepts to understand.
One of my favorite resources for security best practices is OWASP Docker Cheat Sheet. It contains an excellent collection of recommendations. This post builds on that foundation by explaining the Linux security mechanisms behind each recommendation, what they do, why they exist, and the trade-offs involved. By the end, you'll understand not just which security options to use, but why they matter and where to apply them.
TL;DR: This post covers Docker's runtime security model, Linux capabilities, seccomp, AppArmor, user namespaces, read-only filesystems, resource limits, and daemon security. Each section explains the mechanism, why it matters, and how to configure it in Docker, Compose, and Kubernetes. The focus is on limiting what an attacker can do after gaining code execution in a production container. Supply chain, secrets, and network security are not covered here.
Threat Model
Before discussing Docker's security features, we need to answer a simple question:
Who are we defending against?
Security recommendations only make sense within the context of a threat model. A container running on your development machine has very different security requirements than a public-facing production API.
For the rest of this article, we'll assume the following scenario:
- A production application is running inside a Docker container.
- The application is accessible to untrusted users over the network.
- Due to an application vulnerability, an attacker successfully gains remote code execution (RCE) inside the container.
- The attacker can now execute arbitrary commands with the same privileges as the application process.
At this point, Docker has not failed. Preventing vulnerabilities such as SQL injection, command injection, or insecure deserialization is the responsibility of the application, not the container runtime. Docker's role begins after the application has been compromised.
The attacker's objectives may include:
- Reading sensitive data such as API keys, credentials, or mounted secrets.
- Modifying the application or its configuration.
- Establishing persistence so access survives application restarts.
- Escalating privileges within the container.
- Escaping the container and compromising the host.
- Accessing or interfering with other containers.
- Consuming excessive system resources to cause a denial of service.
The purpose of container hardening is to limit the attacker's capabilities after a successful compromise, making each of these objectives more difficult or, ideally, impossible.
A Real-World Example
This isn't a hypothetical scenario. Critical remote code execution vulnerabilities in containerized applications are discovered every year.
One recent example was the React Server Components vulnerability (CVE-2025-55182), which also affected downstream Next.js applications (initially tracked as CVE-2025-66478 for Next.js). Under certain conditions, an unauthenticated attacker could execute arbitrary code on the server by sending a crafted HTTP request to a vulnerable application.
Imagine your application is running inside a Docker container. The attacker successfully exploits the vulnerability and gains code execution inside the application process.
Now ask yourself:
- Can they modify your application?
- Can they steal mounted secrets?
- Can they establish persistence?
- Can they access other containers?
- Can they escape to the host?
- Can they exhaust the host's resources?
These are the questions Docker's security features are designed to answer. Container hardening isn't about preventing the initial vulnerability. That responsibility belongs to the application and its dependencies. Instead, it's about limiting what an attacker can do after they've gained code execution.
The Docker Security Boundary
To understand what Docker can and cannot protect against, you first need to understand where Docker fits in the system stack.
Docker's responsibility covers everything from the Docker Engine layer up to the Container layer. It orchestrates container lifecycles, sets up namespaces, applies capability sets, configures seccomp profiles, attaches LSMs, and manages cgroups.
What Docker does not do is provide a security boundary against the Linux kernel. The kernel is shared between all containers on the host, and Docker configures kernel security mechanisms, it does not add a new security layer on top of them.
This distinction is critical:
Docker is not a security boundary against kernel vulnerabilities.
If a vulnerability exists in a kernel subsystem, OverlayFS, eBPF, netfilter, io_uring, or any other, an attacker who can interact with that subsystem may be able to bypass Docker's isolation entirely. These aren't misconfigurations; they're kernel bugs that Docker cannot patch. Many of the most impactful container escapes in recent years have exploited kernel vulnerabilities rather than Docker configuration flaws. For example, CVE-2023-0386 was a container escape in the Linux kernel's OverlayFS filesystem that allowed an unprivileged attacker to gain root privileges on the host by mounting a crafted filesystem inside a container.
This doesn't mean Docker is insecure. It means that container security is ultimately Linux security. Understanding the kernel mechanisms Docker relies on is essential to understanding both its strengths and its limits.
Throughout the rest of this article, we'll examine how Docker features such as running as a non-root user, dropping Linux capabilities, using a read-only filesystem, enabling seccomp, and applying AppArmor or SELinux policies work together to reduce the impact of a successful compromise. Rather than preventing every attack, these mechanisms are designed to reduce the blast radius when an attacker inevitably gets in.
Running Containers as a Non-Root User
One of the first recommendations you'll encounter in almost every Docker security guide is:
Don't run your containers as root.
It's a good recommendation, but it's also one of the most misunderstood. A common question from developers is:
If containers are already isolated, why does it matter whether my application runs as root?
The short answer is that root inside a container is not the same as root on the host, but it's still far more privileged than a regular user inside that container.
Understanding this distinction is key to understanding why running as a non-root user is considered a fundamental container hardening practice.
Root Inside a Container Isn't Host Root
On a traditional Linux system, the root user (UID 0) has unrestricted access to almost every part of the operating system. Containers change this model.
Processes inside a container still have a user ID, and if that user is root (UID 0), they are considered root within the container's user namespace. However, Docker applies multiple security mechanisms, including Linux capabilities, namespaces, seccomp, and Linux Security Modules (AppArmor or SELinux) that prevent container root from exercising many of the privileges that host root normally possesses.
For example, a root process inside a default Docker container cannot:
- Load kernel modules.
- Mount arbitrary filesystems.
- Modify kernel parameters.
- Change the system clock.
- Inspect or control arbitrary host processes.
These operations require privileges that Docker intentionally removes or restricts. So while container root is certainly not equivalent to host root, it is still the most privileged user inside the container.
Why Kubernetes Recommends runAsNonRoot
If you've deployed applications on Kubernetes, you've probably encountered the following security context:
securityContext:
  runAsNonRoot: true
This setting instructs the kubelet to verify that the container does not start as UID 0. If the image is configured to run as root, Kubernetes refuses to start the container. This isn't because Kubernetes distrusts Docker's isolation. Most applications simply don't require root privileges to serve HTTP requests, process jobs, or interact with databases. Running them as an unprivileged user removes an entire class of post-exploitation techniques with very little operational cost.
Container Escapes and Why They Matter
At this point, you might ask:
If root inside a container isn't real root, why should I care?
Because container escapes exist.
Although rare, vulnerabilities in the Linux kernel or container runtime have occasionally allowed attackers to break out of containers and execute code on the host. If the compromised process is already running with extensive privileges, exploiting such vulnerabilities often becomes significantly easier or more impactful. Running applications as a non-root user doesn't eliminate the possibility of a container escape, but it can reduce the privileges available to an attacker if one does occur.
Historically, many of the most dangerous container escapes have not bypassed Docker's configuration at all, they've exploited vulnerabilities in the kernel itself. Attackers have leveraged flaws in OverlayFS, abused eBPF for privilege escalation, manipulated netfilter and nftables to reach kernel code, and exploited io_uring for arbitrary read/write primitives. In each case, the attacker didn't need to break Docker, they needed to break Linux.
This is why every kernel hardening layer matters. Each one removes a potential attack surface that an exploit could target.
User Namespaces
So far, we've assumed Docker's default configuration, where UID 0 inside the container maps directly to UID 0 on the host. Linux also provides user namespaces, which allow container user IDs to be remapped. This is one of the strongest mitigations available against container escape impact, and it deserves to be treated as a first-class security mechanism rather than an optional add-on.
Here's how the remapping works:
| Inside the container | On the host |
|---|---|
| UID 0 (root) | UID 100000 |
| UID 1 | UID 100001 |
| UID 1000 | UID 101000 |
From the container's perspective, the application is still running as root. From the host's perspective, however, that process is just another unprivileged user. This fundamentally changes the impact of a container escape.
Consider what happens if an attacker finds a kernel vulnerability that lets them execute code outside the container's namespaces. Without user namespaces, the escaped process retains UID 0 on the host, meaning the attacker already has root-level access to the system. With user namespaces enabled, the escaped process is UID 100000, an ordinary unprivileged user. The attacker has escaped the container but gained no elevated privileges on the host.
While capabilities, seccomp, and LSMs all restrict what a process can do, user namespaces restrict the fundamental identity of the process itself. An attacker who escapes the container namespace still has to find a separate privilege escalation vulnerability on the host. This raises the bar from "escape the container" to "escape the container and then compromise the host."
Despite their effectiveness, user namespaces are not enabled by default in many Docker installations. The primary reason is compatibility: bind mounts, file ownership mapping, and certain storage backends behave differently when UIDs are remapped. Some images assume they can write files as root that will be owned by root on the host, which breaks under user namespace remapping. These are solvable problems, but they require configuration and testing that many deployments don't invest in.
For production environments where security requirements are high, enabling user namespaces should be a priority. The protection they provide against container escape impact is difficult to achieve through any other single mechanism.
Linux Capabilities
If running containers as a non-root user is the first step toward reducing privileges, Linux capabilities are the second.
In fact, even if your application runs as root inside a container, it still doesn't possess the same privileges as root on a traditional Linux system. That's because modern Linux no longer treats root as an all-or-nothing concept. Instead, it breaks privileged operations into a collection of discrete capabilities.
Why Linux Split Root Into Capabilities
Historically, Unix had only two privilege levels:
- Root (UID 0): unrestricted access to the system.
- Everyone else: restricted access.
This model was simple, but often too coarse. Consider a web server like Nginx. It needs to bind to port 80, but it doesn't need to load kernel modules, modify the system clock, or reboot the machine.
Under the traditional Unix permission model, there was no way to grant only the privileges required to bind to a privileged port, you had to run the process as root, granting it far more power than necessary.
Linux capabilities solve this problem by decomposing root privileges into individual permissions. Each capability represents a specific privileged operation, allowing processes to receive only the permissions they actually need.
For example:
| Capability | Allows |
|---|---|
CAP_NET_BIND_SERVICE | Bind to ports below 1024 |
CAP_NET_ADMIN | Configure network interfaces, routing tables, firewall rules, and more |
CAP_SYS_PTRACE | Trace or debug other processes |
CAP_SYS_MODULE | Load and unload kernel modules |
CAP_SYS_TIME | Modify the system clock |
CAP_SYS_ADMIN | Perform a broad range of administrative operations |
Docker's Default Capability Set
When you start a container, Docker doesn't give it every Linux capability. Instead, it grants a subset intended to cover the majority of common workloads while dropping capabilities considered too dangerous.
It's important to understand what this default set actually represents. Docker's default capability set is not a carefully optimized security policy. It's a compromise between compatibility and security. Docker's maintainers reviewed the Linux capability list and dropped those that were clearly dangerous (CAP_SYS_MODULE, CAP_SYS_BOOT, CAP_SYS_TIME, CAP_SYS_ADMIN) while keeping everything else that seemed reasonably safe for common workloads. The result is permissive by design, Docker would rather break nothing by default than force users to debug capability issues.
You can inspect the capabilities available to a process inside a container:
docker run --rm alpine sh -c "
apk add --no-cache libcap >/dev/null
capsh --print
"
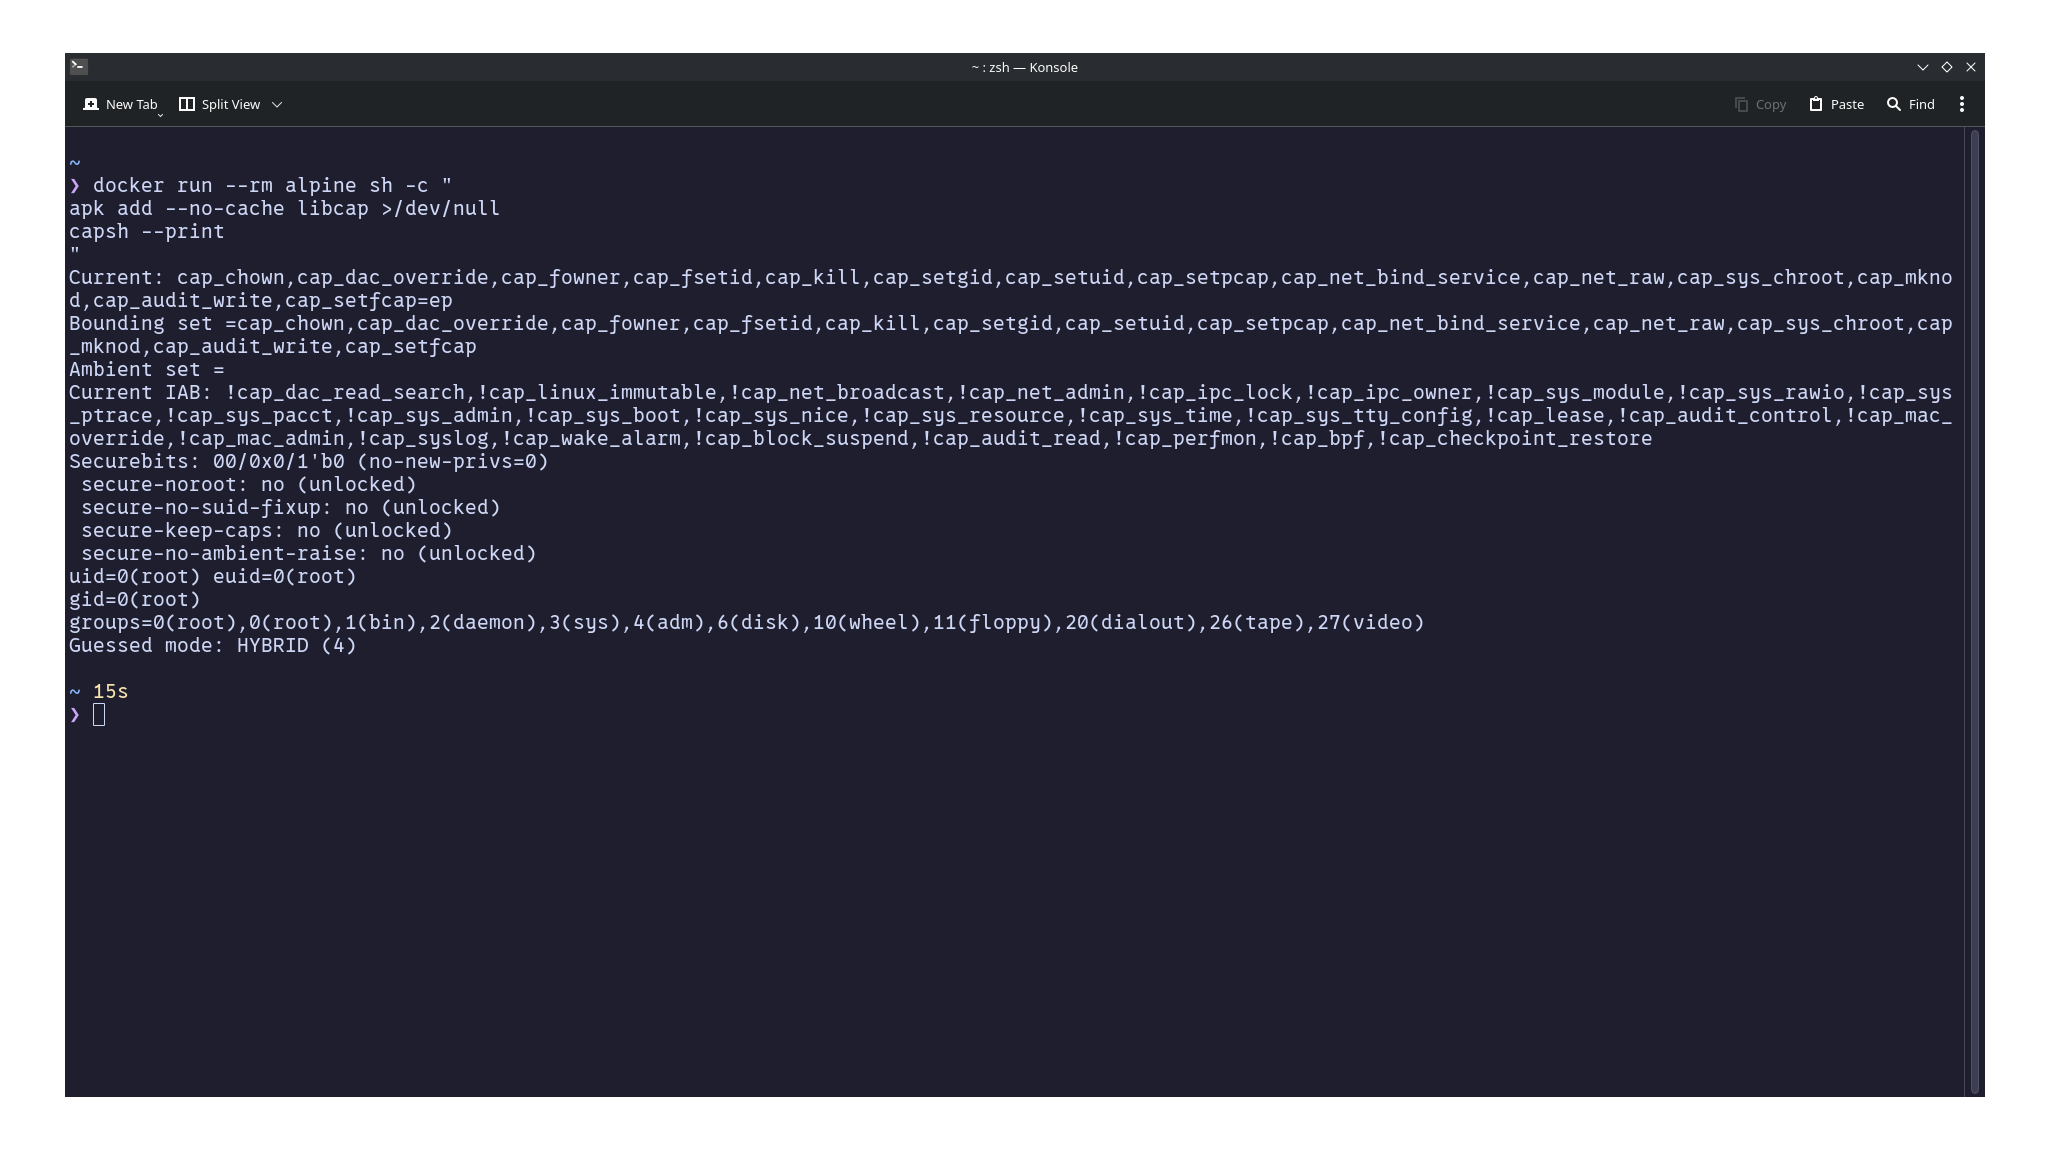
You'll notice that capabilities such as CAP_SYS_MODULE, CAP_SYS_BOOT, CAP_SYS_ADMIN, and CAP_SYS_TIME are absent. This is why a root process inside a default Docker container cannot perform many operations that host root can.
Dropping Capabilities with --cap-drop
Docker already removes many high-risk capabilities by default. Notice that capabilities such as CAP_SYS_ADMIN, CAP_SYS_MODULE, CAP_NET_ADMIN, and CAP_SYS_PTRACE are absent from the container's capability set.
However, Docker still grants a number of capabilities that many applications don't actually need. For example, a typical Next.js application doesn't need to create device nodes (CAP_MKNOD), send raw network packets (CAP_NET_RAW), or change file ownership (CAP_CHOWN).
This is where the --cap-drop flag becomes useful. Rather than relying solely on Docker's default capability set, you can explicitly remove capabilities that your workload doesn't require.
To start with an empty capability set:
docker run --cap-drop ALL nginx
If you inspect the process again with capsh --print, you'll notice that the effective and bounding capability sets are empty. The process may still run as UID 0, but it no longer possesses any Linux capabilities beyond those of a regular unprivileged process.
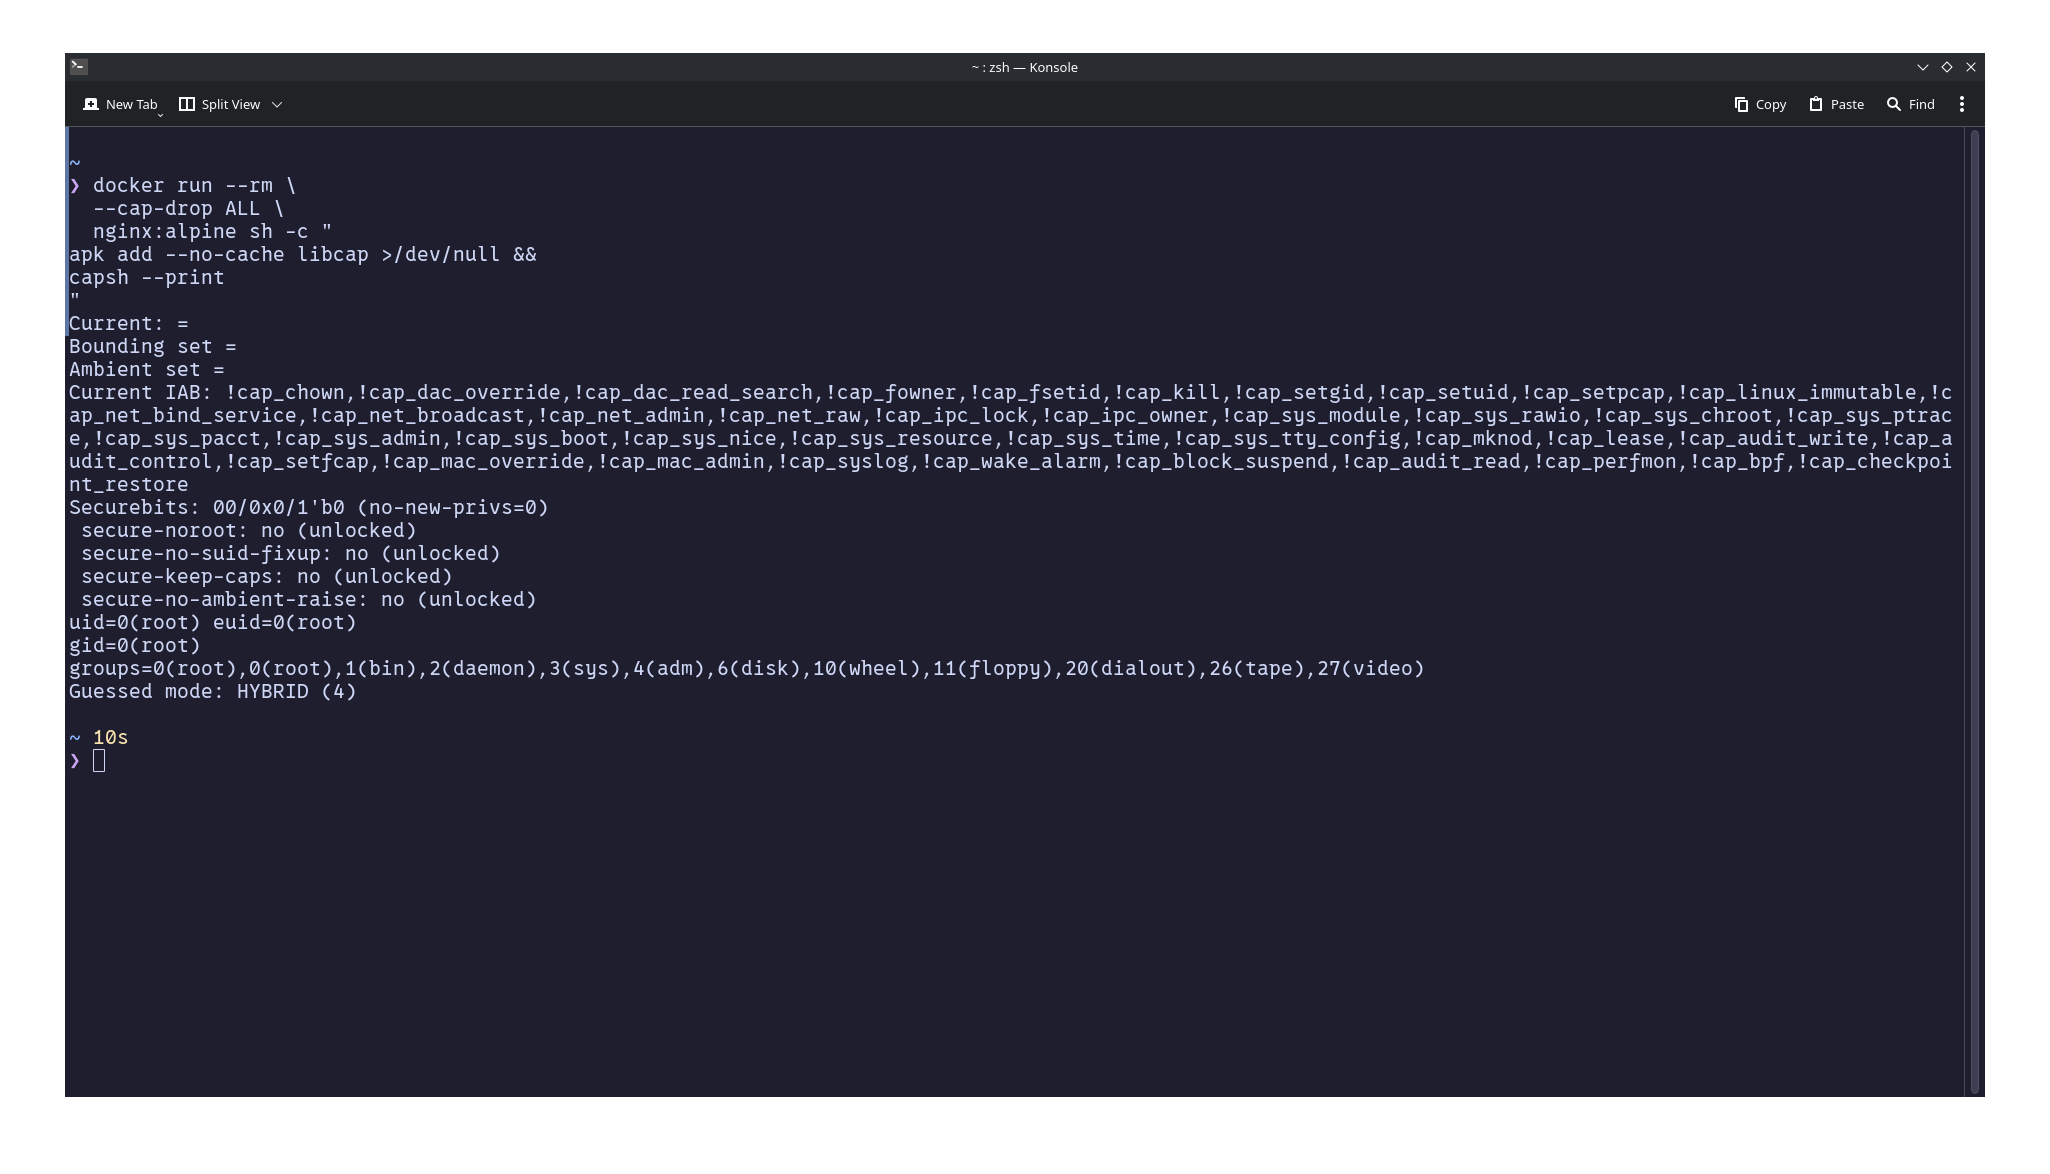
Notice the differences between the two outputs. In the first example, the process is running as UID 0 (root) and is granted Docker's default capability set, including capabilities such as CAP_CHOWN, CAP_NET_BIND_SERVICE, and CAP_SETFCAP. After starting the container with --cap-drop ALL, both the Current and Bounding capability sets become empty, yet the process is still running as UID 0 (root). This clearly demonstrates one of the key concepts behind Linux capabilities: being root is not the same as being privileged. A process may have a user ID of 0, but without the necessary capabilities, the kernel will deny many operations that would normally be available to a fully privileged root process.
In practice, most applications require at least one or two capabilities. A common hardening strategy is therefore:
- Drop every capability using
--cap-drop ALL. - Start the application.
- Add back only the capabilities required for it to function correctly.
This approach, granting a process only the permissions it needs and nothing more, is the Principle of Least Privilege in practice.
Adding Capabilities with --cap-add
Suppose you're running Nginx and want it to listen on port 80. Binding to privileged ports requires the CAP_NET_BIND_SERVICE capability.
Instead of granting broad privileges, you can add only that capability:
docker run \
  --cap-drop ALL \
  --cap-add NET_BIND_SERVICE \
  nginx
This is significantly safer than running the container with Docker's default capability set, or worse, using --privileged.
Why CAP_SYS_ADMIN Is Considered "The New Root"
Among all Linux capabilities, one deserves special attention:
CAP_SYS_ADMIN
If you've spent any time reading kernel documentation or security advisories, you've probably encountered the phrase:
CAP_SYS_ADMINis the new root.
The nickname is well deserved. Unlike capabilities that grant a single, narrowly scoped privilege, CAP_SYS_ADMIN covers an enormous collection of unrelated administrative operations.
Processes with this capability may be allowed to:
- Mount and unmount filesystems.
- Perform namespace operations.
- Configure certain kernel interfaces.
- Execute privileged filesystem operations.
- Interact with eBPF and other advanced kernel features (depending on the kernel version).
Over the years, many kernel vulnerabilities and container escape techniques have relied on obtaining CAP_SYS_ADMIN. For this reason, granting it should be treated with extreme caution. If your application doesn't explicitly require it, don't add it.
CAP_NET_ADMIN: More Powerful Than It Sounds
Another commonly misunderstood capability is CAP_NET_ADMIN. Despite its name, it doesn't simply allow a process to administer networking.
It enables a wide variety of privileged networking operations, including:
- Creating or modifying network interfaces.
- Configuring routing tables.
- Managing firewall rules.
- Enabling packet forwarding.
- Changing network namespaces.
- Configuring traffic control (tc).
These privileges are perfectly reasonable for networking software such as VPN servers, CNI plugins, or software-defined networking components. They are almost never required for a typical web application. Granting CAP_NET_ADMIN to an application that only serves HTTP unnecessarily increases the impact of a successful compromise.
Example Usage
Suppose we're deploying a Next.js application to production. Most Next.js applications don't expose ports 80 or 443 directly. Instead, they listen on an unprivileged port such as 3000 while a reverse proxy like Nginx, Traefik, or HAProxy handles incoming HTTP and HTTPS traffic. In that scenario, the application doesn't require any Linux capabilities.
Docker Compose:
services:
  nextjs:
    image: my-nextjs-app:latest
    cap_drop:
      - ALL
Kubernetes:
apiVersion: apps/v1
kind: Deployment
metadata:
  name: nextjs
spec:
  template:
    spec:
      containers:
        - name: nextjs
          image: my-nextjs-app:latest
          securityContext:
            capabilities:
              drop:
                - ALL
Now imagine an attacker exploits the Next.js vulnerability discussed earlier and gains remote code execution inside the container.
The exploit itself still succeeds, but the compromised process cannot perform privileged kernel operations such as creating raw sockets, configuring network interfaces, loading kernel modules, mounting filesystems, or changing the system clock because those capabilities were never granted.
But what if the application listens on port 80? Some applications, such as an Nginx container running directly on the host or a standalone Docker deployment, listen on privileged ports like 80 or 443. Binding to ports below 1024 requires the CAP_NET_BIND_SERVICE capability.
In those cases, you can grant only that specific capability instead of Docker's entire default capability set.
Docker Compose:
services:
  nginx:
    image: nginx:latest
    cap_drop:
      - ALL
    cap_add:
      - NET_BIND_SERVICE
Kubernetes:
apiVersion: apps/v1
kind: Deployment
metadata:
  name: nginx
spec:
  template:
    spec:
      containers:
        - name: nginx
          image: nginx:latest
          securityContext:
            capabilities:
              drop:
                - ALL
              add:
                - NET_BIND_SERVICE
Whether you're deploying a Next.js application, Nginx, or any other workload, the goal is the same: grant only the capabilities the application actually needs. If it doesn't require privileged kernel operations, don't grant them. If it needs exactly one capability, grant exactly one capability, and nothing more.
Read-Only Filesystems
By default, a container's root filesystem is writable. That means any process running inside the container, including one controlled by an attacker, can create, modify, or delete files anywhere the filesystem permissions allow.
For many applications, this level of write access simply isn't necessary. A web server typically reads its application code, serves requests, and writes temporary data such as logs or cache files. It rarely needs to modify its own binaries or application source code.
Docker allows you to enforce this assumption by mounting the container's root filesystem as read-only.
Docker:
docker run --read-only nginx
Docker Compose:
services:
  app:
    image: my-app:latest
    read_only: true
Kubernetes:
securityContext:
  readOnlyRootFilesystem: true
With a read-only root filesystem, attempts to modify the container's image layers fail, even if the process has sufficient file permissions. This transforms the container into an immutable runtime environment where application files cannot be altered after startup.
Why Would You Want a Read-Only Filesystem?
Once an attacker gains code execution inside a container, one of the first things they'll try is establishing persistence.
For example, they might attempt to:
- Replace the application with a modified version.
- Install a web shell.
- Download additional malware.
- Modify startup scripts.
- Replace system utilities with trojanized versions.
- Leave behind backdoors for future access.
With a writable filesystem, all of these become possible if filesystem permissions allow it. With a read-only root filesystem, these operations immediately fail. The attacker may still execute commands within the compromised process, but they cannot permanently alter the container's image or install persistent malware inside it.
Temporary Writable Storage with tmpfs
Of course, very few applications are completely read-only. Most need somewhere to write temporary files.
Examples include:
/tmp- Runtime sockets
- PID files
- Temporary uploads
- Application caches
Instead of making the entire filesystem writable, Docker allows these locations to be backed by an in-memory filesystem using tmpfs.
Docker:
docker run --read-only --tmpfs /tmp my-nextjs-app:latest
Docker Compose:
services:
  nextjs:
    image: my-nextjs-app:latest
    read_only: true
    tmpfs:
      - /tmp
Kubernetes:
volumes:
  - name: tmp
    emptyDir:
      medium: Memory

containers:
  - name: nextjs
    volumeMounts:
      - name: tmp
        mountPath: /tmp
Unlike the root filesystem, a tmpfs mount exists entirely in memory. Anything written there disappears when the container stops or restarts. This gives applications a place for temporary data without allowing permanent modifications to the container.
Writable Paths Should Be Explicit
One of the biggest advantages of enabling a read-only filesystem is that it forces you to think about where your application actually needs write access. Rather than allowing writes everywhere, you explicitly define the few locations that must remain writable.
For example, an application might legitimately require:
/tmpfor temporary files./var/logif logs are written to disk./uploadsfor user-uploaded content.
Everything else can remain immutable. This significantly reduces the opportunities for attackers to modify the application or establish persistence.
Malware Mitigation
It's important to understand what a read-only filesystem does, and what it doesn't. It does not prevent an attacker from exploiting a vulnerability. It does not stop them from executing arbitrary code. Instead, it prevents many common post-exploitation techniques.
For example, an attacker can no longer:
- Replace application binaries.
- Download malware into the container's filesystem.
- Modify configuration files.
- Install cron jobs or startup scripts.
- Leave persistent backdoors inside the container image.
Read-Only Containers and Immutable Infrastructure
The idea of a read-only filesystem aligns with a broader infrastructure principle known as immutable infrastructure. In an immutable system, running workloads are never modified in place. If an application needs to be updated, you don't SSH into the container and edit files, you build a new image and deploy a new container.
Likewise, if a container becomes compromised, you don't attempt to clean or repair it. You destroy it and replace it with a fresh instance built from a trusted image.
This approach makes deployments more predictable, simplifies incident response, and eliminates an entire class of configuration drift problems.
A read-only root filesystem naturally reinforces this philosophy by ensuring that the running container remains identical to the image that was originally deployed.
Preventing Privilege Escalation with no-new-privileges
So far, we've focused on reducing the privileges that a container starts with. But what if a process tries to gain additional privileges after it has already started?
On a traditional Linux system, there are several mechanisms that allow a process to elevate its privileges during execution. The most common are setuid binaries and file capabilities.
To prevent this class of attacks, the Linux kernel provides a feature called No New Privileges (NNP).
Docker:
docker run --security-opt no-new-privileges:true my-app:latest
Docker Compose:
services:
  app:
    image: my-app:latest
    security_opt:
      - no-new-privileges:true
Kubernetes:
securityContext:
  allowPrivilegeEscalation: false
Once enabled, the kernel guarantees that a process cannot gain privileges that it didn't already possess, regardless of what executable it launches. This makes no-new-privileges one of the simplest yet most effective hardening options available.
Understanding setuid
Linux files can have a special permission known as the setuid bit. Normally, a program runs with the privileges of the user executing it. A setuid program is different, it executes with the privileges of the file owner instead.
For example, the passwd utility needs to modify /etc/shadow, a file writable only by root. Rather than requiring every user to become root, Linux marks the binary as setuid, allowing it to temporarily execute with root privileges.
This mechanism is incredibly useful, but it also creates an opportunity for privilege escalation. If an attacker can execute a vulnerable setuid binary, they may be able to obtain privileges they didn't previously have.
With no-new-privileges enabled, the kernel ignores the setuid bit during execution. The program still runs, but it does not inherit elevated privileges.
File Capabilities (setcap)
Linux capabilities don't have to be assigned only to running processes. They can also be attached directly to executable files using the setcap utility.
For example:
setcap cap_net_bind_service=+ep /usr/local/bin/my-server
This allows the executable to bind to privileged ports without running as root. Under normal circumstances, executing this binary grants the process the specified capability.
However, when no-new-privileges is enabled, those additional capabilities are not acquired, preventing privilege escalation through file capabilities as well.
The Role of execve()
Both setuid and file capabilities take effect during the execve() system call. Every time a Linux process launches another program, the kernel evaluates whether the newly executed binary should receive additional privileges. Normally, this is where privilege elevation occurs.
With no-new-privileges, the kernel changes the rules:
No process may gain more privileges through
execve()than it already possessed.
The process can execute another program, but it cannot become more privileged than it was before.
Example: Mitigating Setuid-Based Privilege Escalation
A real-world example of why no-new-privileges exists is the PwnKit vulnerability (CVE-2021-4034), which was disclosed in 2022.
The vulnerability affected pkexec, a setuid-root utility installed by default on many Linux distributions. Because pkexec executes with the privileges of its owner (root), a flaw in its implementation allowed an unprivileged local user to obtain a root shell.
Imagine our vulnerable Next.js application has been compromised, giving an attacker command execution inside the container. During enumeration, they discover that a vulnerable pkexec binary is present and attempt to exploit it.
Without no-new-privileges, the kernel honors the setuid bit during the execve() call. If the exploit succeeds, the attacker gains a shell running as root. With no-new-privileges enabled, the outcome is different.
Although the attacker can still execute pkexec, the kernel refuses to grant the additional privileges associated with the setuid bit. The process continues running with the attacker's existing privileges, preventing this particular privilege-escalation path from succeeding.
It's important to note that no-new-privileges is not a universal defense against every local privilege-escalation vulnerability. It specifically prevents new privileges from being acquired through setuid executables and file capabilities during execve().
Seccomp: Restricting System Calls
Even after removing unnecessary capabilities and preventing privilege escalation, a compromised process can still invoke Linux system calls.
Every interaction between userspace and the Linux kernel ultimately happens through a system call, or syscall.
Reading a file. Opening a socket. Creating a process. Allocating memory. Eventually, every one of these operations becomes a syscall.
Seccomp allows us to control which syscalls a process is allowed to invoke. Modern Linux has hundreds of syscalls, mount(), bpf(), ptrace(), powerful kernel interfaces that most applications never need.
Docker's Default Seccomp Profile
By default, Docker applies a seccomp profile to every container.
Rather than allowing unrestricted access to the kernel, Docker blocks a number of high-risk syscalls that are rarely required by ordinary applications. Examples include operations related to kernel debugging, loading kernel modules, certain namespace operations, and legacy or dangerous kernel interfaces.
It's important to understand what this default profile is, and what it isn't. Docker's default seccomp profile is fairly permissive. It blocks syscalls that are clearly dangerous or almost never needed in containers, but it is not a strict whitelist. The majority of syscalls remain permitted. This is by design: a more restrictive default would break many legitimate workloads.
In high-security environments, the default profile should be seen as a starting point rather than a final configuration. Custom profiles that whitelist only the syscalls your application actually uses provide significantly stronger protection.
Dangerous System Calls
Many historical Linux vulnerabilities have involved privileged or complex system calls. Some examples include:
ptrace()for debugging other processes.mount()for manipulating filesystems.bpf()for interacting with the eBPF subsystem.userfaultfd()which has been involved in multiple privilege escalation vulnerabilities.- Certain namespace-related syscalls.
These interfaces are incredibly powerful. They're also unnecessary for the overwhelming majority of web applications. Blocking them removes an entire class of potential post-exploitation techniques.
Custom Seccomp Profiles
Docker's default seccomp profile is intentionally generic. It works well for most workloads, but high-security environments often go further by defining custom profiles tailored to a specific application.
For example, a Next.js application has very different syscall requirements than a VPN server or a container runtime.
A custom seccomp profile can whitelist only the syscalls the application actually uses while denying everything else.
Example: Blocking Kernel-Level Attacks
A Python API server is compromised through a vulnerable dependency. The attacker gains code execution and tries to use ptrace() to inject into other processes or bpf() to interact with the eBPF subsystem.
If those syscalls are blocked by the seccomp profile, the kernel immediately denies the request.
The attacker still has code execution, but they cannot freely access every kernel interface on the system.
AppArmor and SELinux
Thus far we've covered capabilities (which control privileged operations) and seccomp (which controls system calls). There's a third layer in this stack: Linux Security Modules, or LSMs.
AppArmor and SELinux are the two most widely deployed LSMs. They answer a different question than capabilities or seccomp:
Even if a process has the right capability and the right syscall, what files, directories, network resources, and other objects may it actually access?
Where capabilities define what a process can do, and seccomp defines which kernel APIs it can call, LSMs define which objects it can touch.
What LSMs Do
An LSM is a kernel framework that allows security policies to be enforced on every security-sensitive operation. Whenever a process attempts to open a file, bind to a socket, or access a directory, the LSM checks its policy before allowing or denying the operation.
AppArmor uses path-based policies. You write a profile that says things like "this binary may read /etc/nginx/nginx.conf but may not write to it," or "this binary may not create network sockets at all."
SELinux uses label-based policies. Every process and every object (file, socket, device, etc.) gets a security label, and the policy defines which labeled processes may access which labeled objects. SELinux is more powerful and more complex, which is why it's more common in government and high-security environments than in general-purpose container deployments.
How Docker Uses LSMs
When you run a container, Docker can attach an AppArmor profile or SELinux context to the container's processes. This provides an additional layer of access control beyond what capabilities and seccomp provide.
Docker ships with a default AppArmor profile for containers that restricts access to sensitive host paths and system resources. It's applied automatically if AppArmor is loaded on the host.
SELinux support in Docker is available but requires the host to be running SELinux (most common on RHEL/CentOS/Fedora systems) and the selinux-enabled flag to be configured in the Docker daemon.
How Capabilities, Seccomp, and LSMs Work Together
Each Linux security mechanism answers a different question. Understanding the distinction helps you think clearly about what each layer contributes:
- Capabilities answer: "What privileged operations can I perform?"
- Seccomp answers: "Which kernel APIs can I call?"
- LSMs answer: "Even if I can call it, what objects may I access?"
These layers are complementary. A process might have CAP_NET_BIND_SERVICE (it can bind to privileged ports) and seccomp might allow the bind() syscall, but an AppArmor profile can still block it from binding to a specific port or network interface. Each mechanism constrains a different dimension of what the process can do.
None of these layers alone is sufficient. Together, they create a defense-in-depth posture where an attacker must bypass multiple independent restrictions to achieve their objectives.
Rootless Docker
Rootless Docker runs the Docker daemon and containers without root privileges on the host. It builds on user namespaces, the same mechanism discussed earlier, but goes further by also running the Docker daemon itself as an unprivileged user.
The key difference from standard user namespace remapping is scope. With user namespaces in standard Docker, only the container processes are remapped, while the Docker daemon still runs as root. With rootless mode, the entire Docker stack, daemon, containerd, and runc, runs without host root privileges.
Rootless Docker has some limitations. It cannot bind to ports below 1024 (though tools like authbind or redirectors can work around this), it has limited support for certain storage drivers, and it doesn't work with all network configurations.
For environments where an additional layer of host-level isolation is desired, rootless mode is a valuable option. For most production deployments, the combination of standard user namespaces with the other hardening measures discussed in this article provides substantial protection.
Docker Daemon Security
Docker's security model isn't limited to containers. The Docker daemon itself is a critical security boundary.
The docker Group Is Root
On systems where Docker is installed, users can be added to the docker group to run Docker commands without sudo. This is convenient, but it comes with a significant security implication: membership in the docker group is effectively equivalent to root access on the host.
The reason is straightforward. A user in the docker group can:
- Start containers with any capability, including
--privileged. - Mount any host directory into a container with full read-write access.
- Access the Docker API socket directly.
- Modify Docker's configuration.
This means any process, containerized or not, that has access to the Docker socket effectively has root access to the host.
Mounting /var/run/docker.sock Into a Container
A common anti-pattern in Docker deployments is mounting the Docker socket (/var/run/docker.sock) into a container. This is often done to allow a container to manage other containers, for example, a CI/CD agent or a monitoring tool.
services:
  container-manager:
    image: my-manager:latest
    volumes:
      - /var/run/docker.sock:/var/run/docker.sock
Mounting the Docker socket into a container gives that container's processes the same privileges as a user in the docker group. If an attacker compromises that container, they can start new containers, mount arbitrary host filesystems, and gain full host-level access, all without escaping the container.
If a workload requires Docker access, consider using the Docker API over TLS with client certificates, or use a security-aware proxy that exposes only the specific API operations the workload needs.
Beyond the socket, the Docker daemon itself should be secured. Enabling TLS for the Docker API prevents unauthenticated access, and audit logging helps detect suspicious API calls. Rootless mode and deeper daemon hardening will be covered in a follow-up post.
Resource Abuse
So far, we've focused on preventing an attacker from gaining additional privileges or modifying the system. However, not every attack is about privilege escalation.
Sometimes, an attacker simply wants to make your application unavailable.
Imagine our vulnerable Next.js application has been compromised. Instead of attempting to escape the container, the attacker executes an infinite loop, continuously allocates memory, or spawns thousands of child processes.
These attacks don't require elevated privileges, they simply abuse the resources available to the container.
To mitigate this class of attacks, Docker relies on cgroups (Control Groups), allowing administrators to place limits on CPU, memory, and process creation.
Memory Limits
Without memory limits, a single compromised container can consume all available RAM on the host, potentially affecting every other workload.
Docker Compose:
services:
  nextjs:
    image: my-nextjs-app
    deploy:
      resources:
        limits:
          memory: 512M
Kubernetes:
resources:
  requests:
    memory: "256Mi"
  limits:
    memory: "512Mi"
If the process exceeds its configured limit, the Linux Out-Of-Memory (OOM) killer terminates it instead of allowing it to exhaust host memory.
Process Limits (pids_limit)
Another common denial-of-service technique is the fork bomb, where a process continuously creates child processes until the operating system can no longer create new ones.
Docker allows us to restrict how many processes a container may create.
services:
  nextjs:
    image: my-nextjs-app
    pids_limit: 100
Even if an attacker gains code execution, they cannot create more processes than the configured limit.
CPU Limits
CPU exhaustion is another straightforward way to disrupt a service.
By configuring CPU limits, we ensure that a single compromised container cannot monopolize the host's processors.
Docker Compose:
services:
  nextjs:
    image: my-nextjs-app
    deploy:
      resources:
        limits:
          cpus: "1.0"
Kubernetes:
resources:
  requests:
    cpu: "500m"
  limits:
    cpu: "1"
These limits don't prevent abuse, they contain it.
Device Access
By default, Docker isolates containers from the host's hardware. This is important because, on Linux, many hardware resources are exposed as files under /dev. Granting access to one of these devices often provides direct access to a kernel-managed interface, so device access should be granted deliberately rather than by default.
Common examples include:
- NVIDIA GPUs for AI and machine learning inference.
/dev/net/tunfor VPN software such as WireGuard or OpenVPN.- Hardware Security Modules (HSMs) used for cryptographic key management.
- USB or serial devices used in industrial and IoT deployments.
For example, a WireGuard container requires access to the TUN device:
services:
  wireguard:
    image: linuxserver/wireguard
    devices:
      - /dev/net/tun:/dev/net/tun
    cap_add:
      - NET_ADMIN
Rather than exposing the entire /dev hierarchy, or running the container as --privileged, grant only the specific devices your workload requires.
Device access is a broad topic in its own right, and the exact devices needed vary significantly between workloads. The important takeaway isn't to memorize every possible device, but to follow the same principle we've applied throughout this article: expose only what the application actually needs, and nothing more.
Docker supports many additional device-related features that are beyond the scope of this article, including device permissions (r, w, m), GPU support, the Container Device Interface (CDI), and device cgroup rules. If your workload requires more advanced device configuration, the official Docker documentation provides a comprehensive reference for the --device flag and related runtime options:
https://docs.docker.com/reference/cli/docker/container/run/#device.
Privileged Containers
By now we've covered several layers of Docker's security model:
- Running as a non-root user.
- Dropping unnecessary capabilities.
- Using a read-only root filesystem.
- Preventing privilege escalation.
- Restricting system calls.
- Limiting resources.
- Exposing only required devices.
- Configuring LSMs.
The --privileged flag effectively bypasses many of these protections.
What --privileged Actually Does
Running a container with --privileged is much more than "giving it more permissions." Docker grants the container nearly every Linux capability, provides broad access to host devices, relaxes device cgroup restrictions, and disables several of the runtime's default safety mechanisms.
The result is a container that behaves much more like a regular process running directly on the host.
Why You Should Avoid It
A common troubleshooting pattern is:
The container doesn't have permission.
Run it with
--privileged.
While this often fixes the immediate problem, it also grants dozens of permissions the application may never need.
Instead, identify the specific requirement:
- Does the application need
CAP_NET_ADMIN? - Does it need access to
/dev/net/tun? - Does it need a single Linux capability?
Granting one permission is almost always preferable to granting every permission. As a rule of thumb, --privileged should be reserved for specialized infrastructure software such as low-level container runtimes, debugging tools, or hardware management utilities, not ordinary web applications, APIs, or background workers.
If your production application requires --privileged, it's usually worth investigating why before accepting it as the solution.
Putting It All Together
Throughout this article, we've explored Docker's security features individually. In practice, however, these features aren't meant to be used in isolation, they complement one another.
Let's revisit the threat model from the beginning of this article.
An attacker exploits a vulnerability in our Next.js application and gains remote code execution inside the container.
At this point, every hardening measure we've discussed begins working together:
- The application runs as a non-root user.
- All unnecessary Linux capabilities have been removed.
- The root filesystem is read-only.
- Temporary files are written only to tmpfs.
- Privilege escalation is disabled.
- The container is constrained by CPU, memory, and PID limits.
- Only the minimum resources required by the application are exposed.
None of these measures prevents the initial exploit. Instead, they work together to reduce the attacker's options after a successful compromise.
The following examples show what this might look like for a production-ready Next.js application running behind an Nginx reverse proxy.
Docker
docker network create web

docker run -d \
  --name nextjs \
  --network web \
  --user 1000:1000 \
  --read-only \
  --tmpfs /tmp \
  --cap-drop ALL \
  --security-opt no-new-privileges:true \
  --memory 512m \
  --cpus 1 \
  --pids-limit 100 \
  my-nextjs-app:latest

docker run -d \
  --name nginx \
  --network web \
  -p 80:80 \
  --read-only \
  --tmpfs /var/cache/nginx \
  --tmpfs /var/run \
  --cap-drop ALL \
  --cap-add NET_BIND_SERVICE \
  --security-opt no-new-privileges:true \
  nginx:latest
Docker Compose
services:
  nextjs:
    image: my-nextjs-app:latest
    user: "1000:1000"
    read_only: true
    tmpfs:
      - /tmp
    cap_drop:
      - ALL
    security_opt:
      - no-new-privileges:true
    pids_limit: 100
    deploy:
      resources:
        limits:
          cpus: "1.0"
          memory: 512M

  nginx:
    image: nginx:latest
    ports:
      - "80:80"
    read_only: true
    tmpfs:
      - /var/cache/nginx
      - /var/run
    cap_drop:
      - ALL
    cap_add:
      - NET_BIND_SERVICE
    security_opt:
      - no-new-privileges:true
Kubernetes
apiVersion: apps/v1
kind: Deployment
metadata:
  name: nextjs
spec:
  replicas: 1
  selector:
    matchLabels:
      app: nextjs
  template:
    metadata:
      labels:
        app: nextjs
    spec:
      containers:
        - name: nextjs
          image: my-nextjs-app:latest
          securityContext:
            runAsNonRoot: true
            allowPrivilegeEscalation: false
            readOnlyRootFilesystem: true
            capabilities:
              drop:
                - ALL
          resources:
            requests:
              cpu: "250m"
              memory: "256Mi"
            limits:
              cpu: "1"
              memory: "512Mi"
          volumeMounts:
            - name: tmp
              mountPath: /tmp
      volumes:
        - name: tmp
          emptyDir:
            medium: Memory
These examples aren't intended to be copied verbatim into every production environment. Every workload has different requirements. Instead, they demonstrate the security mindset we've followed throughout this article: remove privileges you don't need, expose only the resources your application actually requires, and assume the application may eventually be compromised.
Conclusion
Docker security is defense in depth, not a silver bullet. Non-root users, capabilities, read-only filesystems, no-new-privileges, seccomp, LSMs, cgroups, and device restrictions each remove a slice of attack surface. Individually they're useful. Together they make post-exploitation significantly harder.
Docker won't prevent your application from being compromised. What it does is limit what an attacker can do after they get in, and that distinction matters. Every unnecessary permission, writable directory, or exposed device is an opportunity you didn't need to give them.
Security isn't about making compromise impossible. It's about ensuring that when it happens, the attacker has as few options as possible.
This post focused on Docker's runtime security mechanisms. If I have time, I might write follow-ups on supply chain security, secrets management, network policies, and runtime detection.